Using Python with MASTA
This article assumes you have downloaded and configured a Python installation. Information on how to do this can be found in the previous article.
There are two ways of running a Python script in MASTA. Either they are launched from within MASTA using scripted properties, or launched from outside of MASTA. The following breakdown explains the pros and cons of each method.
Components are passed to the script directly.
Act as Properties, so can be added to reports.
Flexible. The same script can be used for the same component on different designs.
No Jupyter Notebooks support.
Script only works on one design at a time.
Can use Jupyter Notebooks.
Can load in multiple designs.
Need to manually find components in the design.
Must explicitly load in your designs.
The next section explains how to launch a script inside MASTA, with a later section explaining the external approach.
Running a Python Script
Python scripts can be launched from MASTA, just as you would using scripts written in other supported languages. Using this method, a script can be attached to any component within a design, and a reference to that component can be passed to the script.
Firstly, MASTA needs to know where your Python installation is.
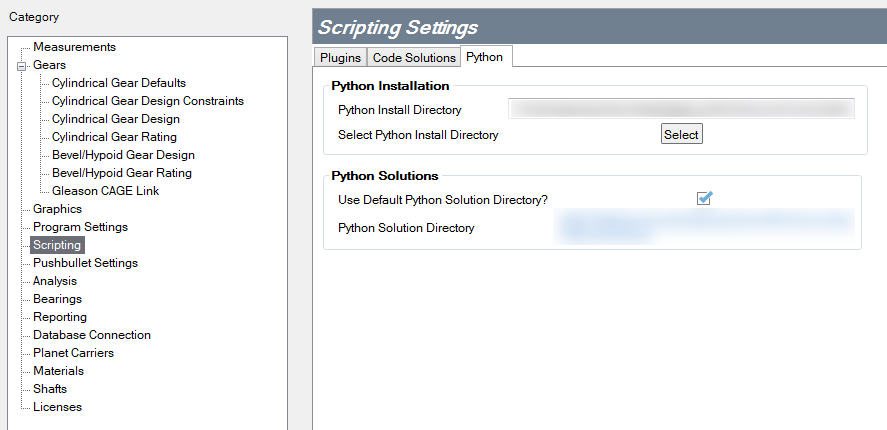
Open MASTA and select
Edit > Settings > Scripting > Python > Python Installationand find the location of the Python install directory using the Select Python Install Directory Dialog. This is the directory wherepython.exeis located.Figure 1 - Python Scripting Settings
For this guide the location was ~\AppData\Local\Programs\Python\Python36 but this may not be the same on your computer.
If you are unsure of the location, Visual Studio Code tells you the install directory of the Python interpreter when selecting one from the status bar. If you are using Miniconda you may have multiple Python install directories; one for each environment. Select the directory for the version of Python you want to use.
You may also specify a custom Python Solution Directory. This is the folder that MASTA searches in for your Python scripts. The default location is C:\Users\USER_NAME\My Documents\PythonSolutions.
Example of a MASTA Python Script
The mastapy package has had a recent overhaul to vastly improve the Python scripting workflow. The 2.x version of mastapy is a complete implementation of the MASTA API in Python, with features such as proper intellisense support and conversion between MASTA types and standard Python types. See the mastapy 2.x article for more information. Note that it has complete legacy support, so all of your old scripts will still work without any modifications.
Once MASTA knows your Python install directory a script must be written. Before writing any Python code, the MASTA API Python package (also known as mastapy) must be installed. This is a complete Python wrapper for interacting with the MASTA API. It is distributed using PIP, much like other Python packages.
To install it, run the following command in Command Prompt:
python -m pip install mastapy --upgradeTo use a Python script with MASTA, the MASTA API library must be imported. A method must be defined with a single argument passed to it and a special
masta_propertydecorator. Note that the argument must have a type hint specifying the type of the component being passed to the Python script. A return type may also be specified should you wish to return data back to MASTA.Refer to: typing for more information on type hints, newly available in Python 3.5 onwards.
The following code demonstrates the correct syntax:
from mastapy import masta_property, MeasurementType
from mastapy.system_model import Design


name = 'my_property'
measurement = MeasurementType.SHORT_LENGTH


@masta_property(name, measurement=measurement)
def my_property(my_component: Design) -> float:
   print('My Design is: {}'.format(my_component.design_name))
   return 1.0
In this example, the my_component argument is a reference to the component supplied to the script by MASTA. It is of type Design. The method also returns a value of type float.
Generating a Python Script Property
To ensure correct syntax for properties in a Python script, MASTA contains a facility for generating properties for you.
In the Scripting tab, select Generate Code Solution Property.
Figure 2 - Generate Code Solution propertyA window will pop up. Select Python as the Property Language and enter a Property Name. A property stub will be automatically generated. Other information can be added to further customise the property.
Figure 3 - A generated Python property stub
This stub can then be copy-pasted into your code editor.
Saving your Python Script
The default location for saving your Python scripts is C:\Users\USER_NAME\My Documents\PythonScripts. Unless changed, MASTA will only search this directory for Python files.
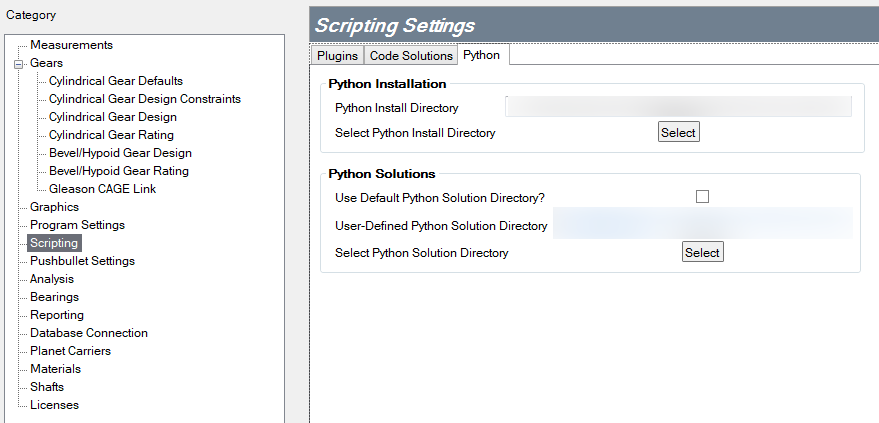
You can change this location in the Scripting Settings by deselecting Use Default Python Solution Directory? and searching for a new directory.
Launching a MASTA Python Script
Once a script is written and saved to the correct location, it should be able appear on your specified component in MASTA.
Load in your design and run any load cases as normal.
Go to the Scripting tab (Design, Imported FE, Power Flow, NVH etc. all have their own Scripting tab.)
In the Properties section, find the component you specified in your script.
Figure 5 - PropertiesYour script should appear. Select Calculate to run it.
Figure 6 - Running a script
For instance, the script in the previous section adds a property to a Design component. Therefore, navigating to the Design component in the Scripting tab in MASTA will show the script.
Running a Python Script Outside of MASTA
It is also possible to use a Python Script without launching it from inside MASTA. Note that if this option is chosen, designs must be loaded into the Python program manually and components must be searched for in loaded design. You may wish to use this method if you are interested in using Jupyter Notebooks to run your code. Also note that you will need to install the MASTA API Python package.
To use the MASTA API from an external script, it must first be initialised. Fortunately, this is made simple using mastapy.
Enter the following Python code at the start of your program:
from mastapy import init

init('MY_MASTA_DIRECTORY')
Replace
MY_MASTA_DIRECTORYwith the actual path to your MASTA directory so that theMastaAPI.dllcan be found.
Instead of calling init at the start of every Python MASTA script, you can create a mastafile.py file.
Once this has been completed, you can freely use the MASTA API functionality in your script. For instance, a design can be loaded into your program using the following code snippet:
from mastapy import init

init('MY_MASTA_DIRECTORY')

from mastapy.system_model import Design
my_design = Design.load('PATH_TO_MY_DESIGN')
Where PATH_TO_MY_DESIGN is the path to your .masta design file. The entire functionality of the MASTA API can be found in the MASTA API documentation.
Once the code has been written, it is time to run the script. Visual Studio Code allows you to easily execute Python scripts.
Select the tab your script is in and click Debug > Start Without Debugging. A terminal will open at the bottom of your Visual Studio Code window and your script will launch. Any outputs from the script (such as print statements) will be outputted to the terminal.
It is also possible to launch your script with debugging enabled.
Alternatively, you can use the python command in Command Prompt to launch your script.
Type
python path/to/my/script.pyand press enter to run your script.You can pass arguments to your script using this method without having to set up a launch configuration inside Visual Studio Code (this is explained in a later section).
Using Jupyter Notebooks
A great benefit of using Python for writing your MASTA scripts is the ability to also use Jupyter Notebooks. Jupyter Notebooks is a powerful, web-based tool that allows you to create interactive documents that can contain live code samples, equations and visualisations interspersed with written text. An example is available here explaining the classic Traveling Salesperson problem with visualisations generated using Python and Jupyter Notebooks.
Jupyter Notebooks can be integrated into external MASTA scripts only. However, they can be used to eliminate the problem of having to repeatedly load and search your MASTA designs to find components. This is because blocks of code (as seen in the Traveling Salesperson example) only need to be executed once - the outputs of each code block are maintained for the lifetime of the Jupyter Notebook kernel. An example of this in action can be seen further into this section.
Using Jupyter Notebooks with Visual Studio Code
By installing the Python extension, Jupyter Notebook functionality is already available for use.
An extensive guide to Jupyter Notebooks with Visual Studio Code is available in the Visual Studio Code documentation.
Example using Jupyter Notebooks in Visual Studio Code
The syntax for creating a Jupyter Notebooks cell in Visual Studio Code is very simple. The following code creates three separate code cells which can be run individually, together, or completely out of order.
#%%
print('The first cell has been executed!')

#%%
x = 5
print('The second cell has been executed!')
print('This is also part of the second cell!')

#%%
print('The third cell has been executed!')
print('The value of x is {}. This cell will throw an error if run before the second cell!'.format(x))
The #%% syntax can be used to create a Jupyter Notebooks cell. All code below #%% will be contained in the cell until another #%% is found.

Once a cell has been created, you are given two or three options for executing it. To execute a specific cell, click Run Cell. To execute the first cell up to the current cell in order, click Run Above. To execute the current cell and all cells below it in order, click Run Below.
Note that if you run the third cell without running the second cell, an error occurs. This is because the variable x is defined and initialised in the second cell but used in the third cell. If you click Run Above on the third cell instead, x will get defined when the second cell is run and no errors will occur when the third cell is run again.

For additional usage instructions for Jupyter Notebooks with Visual Studio Code, please refer to the documentation on the Visual Studio website.
Debugging your Script
The Python extension for Visual Studio Code comes with an integrated debugger with features such as breakpoints, watches, a detailed callstack and more.
Debugging External Scripts with Visual Studio Code
When working with external scripts, there are two ways you can launch the debugging facilities. You can either use the default debugging configuration which is perfect for quick and painless debugging, or use a specific debug launch configuration that allows for a customisable debugging experience (for instance, you can set command line arguments). This section will explain how to use the basic configuration, whereas the next section describes how to set up a specific launch configuration.
To be able to use the debugger, no matter the configuration, you must first place a breakpoint in your code. A breakpoint allows you to pause the program execution on a specific line and investigate the current state of the program.
Place a breakpoint by clicking to the left of the line number on the line of code you want the debugger to pause on.

In this example, a breakpoint has been placed on line 5. This will pause the execution of the program without executing line 5 until the program continues.
To launch the basic debugger, follow these steps:
Place a breakpoint in your script.
Click
Debug > Start Debugging.From the drop-down list, select Python File.
The debugger will now launch and your breakpoint will get hit unless errors occurred prior to reaching it.
More information on debugging with Python in Visual Studio Code is available here.
Integrating the Visual Studio Code debugger with scripts launched from MASTA
Debugging a script that has been launched from MASTA requires slightly more setup. All of the same functionality is available, but the debugger must first be set up so that it can communicate with MASTA.
A line of code must be inserted into the code to tell MASTA to start debugging.
from mastapy import start_debugging

start_debugging()
Setting up Remote Debugging
Swap to the Debug tab in Visual Studio Code.
Select Remote Attach from the drop-down menu and keep the default entries of "localhost" and "5678".
Figure 11 - Remote Attach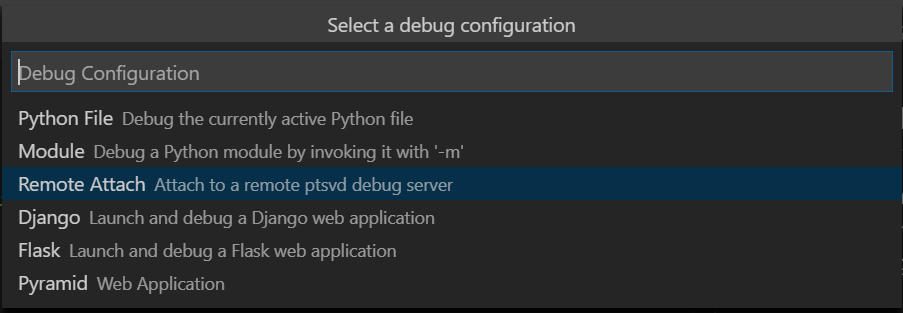
A
launch.jsonfile will open. Change theremoteRootvalue to be equal to the path to the folder where your Python script is located and save the file. This is how the debugger will find your script when launched from MASTA.Figure 12 - launch.json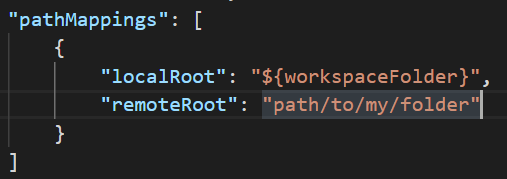
Now when you launch your script from MASTA, execution will halt until a debugger has been attached. Launch your script from MASTA, then go back to Visual Studio Code.
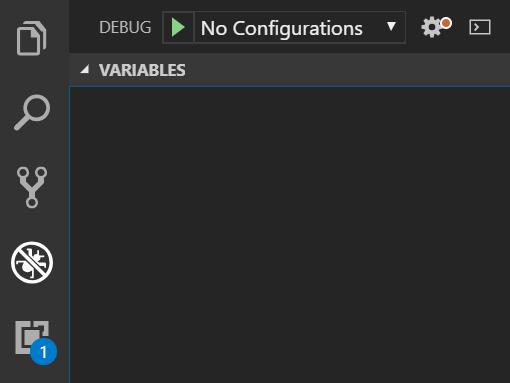
Make sure your newly created configuration is selected in the configurations drop-down menu and start the debugger using the green start arrow in the Debug tab.
Figure 13 - Start debugging
Debugging will now be able to resume as normal.
