Scripting in MASTA
This document outlines the Scripting functionality within SMT’s MASTA software. Scripting refers to the ability of a MASTA user to extend and enhance the functionality of MASTA by writing their own .NET code that is then compiled and integrated seamlessly.
MASTA users can create additional properties of items within a transmission design e.g. a cylindrical gear and use those properties within a Custom Report, a Parametric Study, Design Space Search, etc. The properties are created via scripting will be referred to as User Defined Properties.
Users have great flexibility in extending the functionality of MASTA whilst protecting any intellectual property.
Licensing
To use the scripting functionality within MASTA users must have selected both MASTA Core (MC101) and Maintenance (MC900) licenses or MASTA Core (MC101) and Scripting (MC701).
Scripting Tab
If licensed to use Scripting, the Scripting Tab is accessible within MASTA.
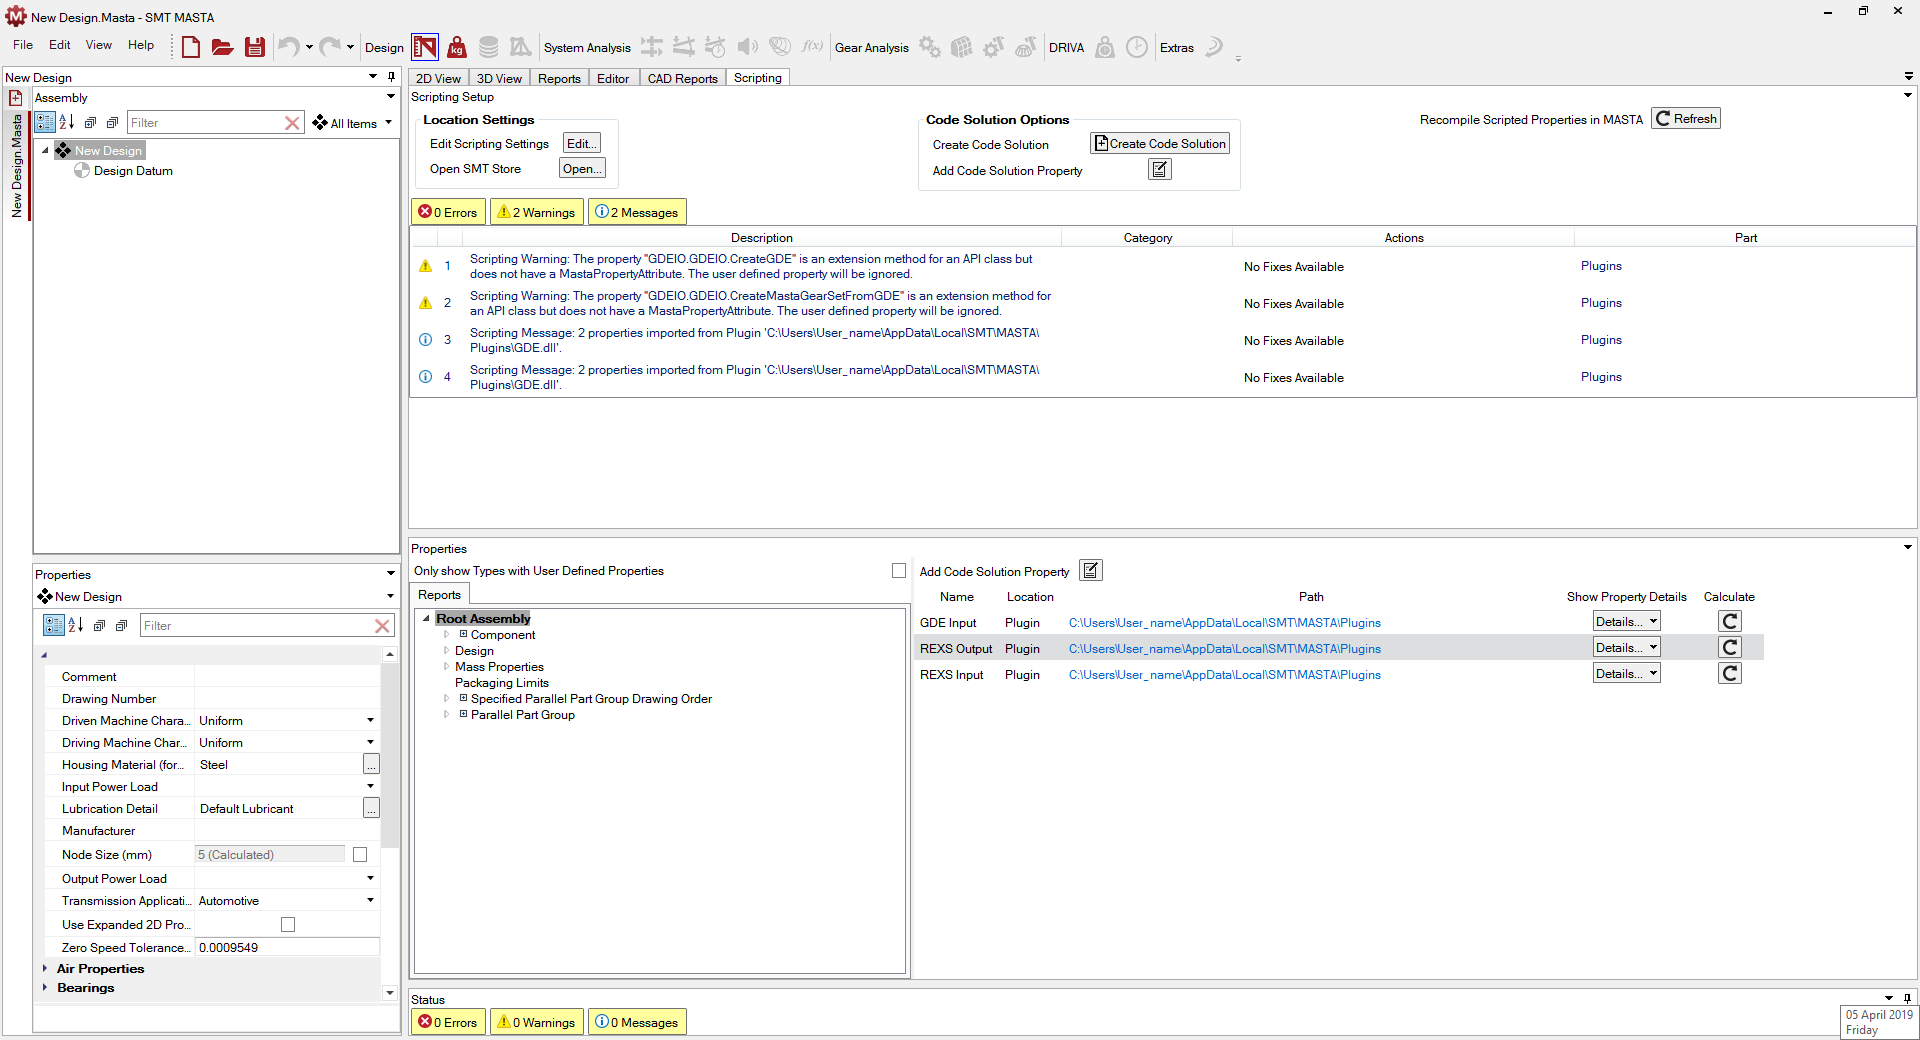
The Scripting window is split into three main sections:
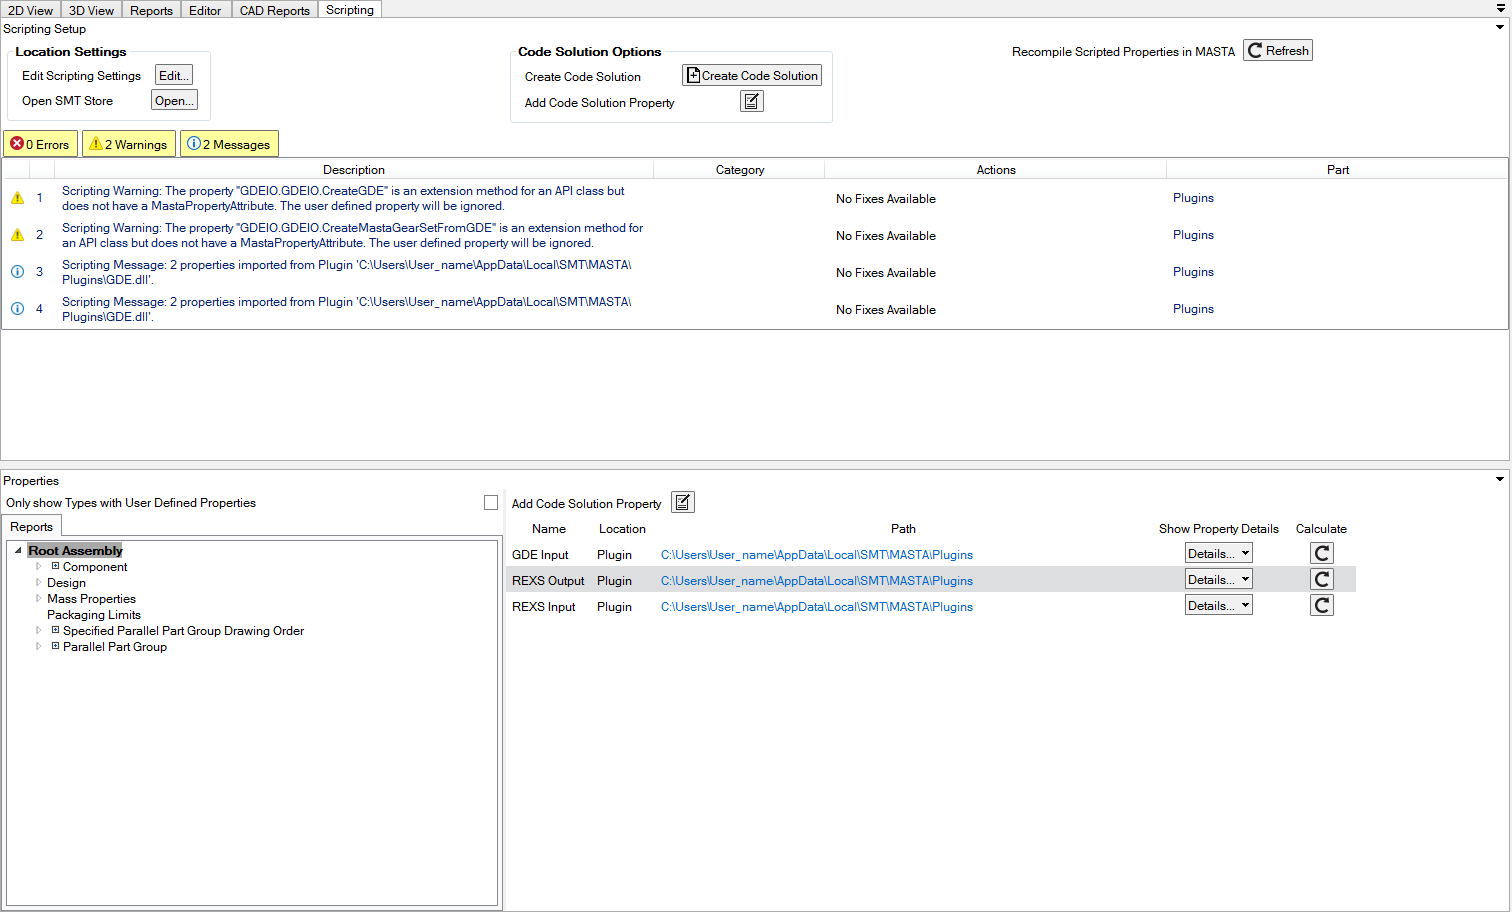
Scripting Setup - Options to control, create and import User Defined Properties.
Status Window - Displays Messages, Errors and Warnings regarding the compilation and import of User Defined Properties.
Properties - Contains an Entity Tree and a Watch Window.
Scripting Setup
The Scripting Setup section contains options to control, create and import User Defined Properties.
Location Settings
Click the Edit button located in Location Settings.

The Edit Scripting Settings window is displayed.
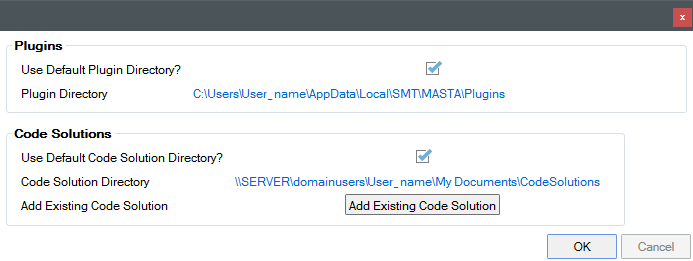
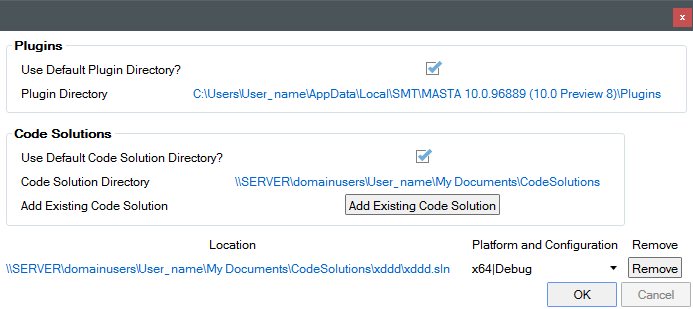
In the Plugins section there is the option to change the default location of the Plugins Directory. The Plugins Directory is the location on the hard disk of the computer running MASTA (or maybe a network location) that will be inspected for precompiled binary files (with the dll file extension) containing User Defined Properties. There is also the option to access the selected Plugin Folder.
Refer to: Plugins for more information.
In the Code Solutions section there is the option to change the default location of where new Code Solutions are created. There is also an Add Existing Code Solution option that allows the user to browse for a Visual Studio solution file (with .sln file extension) that contains one or more projects where User Defined Properties are defined. Any installed Code Solutions are listed at the bottom of the dialog (and the Platform and Configuration that MASTA will use to compile the solution).
Refer to: Code Solutions for more information.
Code Solution Options
Create Code Solution
Click the Create Code Solution button located in the Code Solutions Options.

The Creation Options window is displayed.
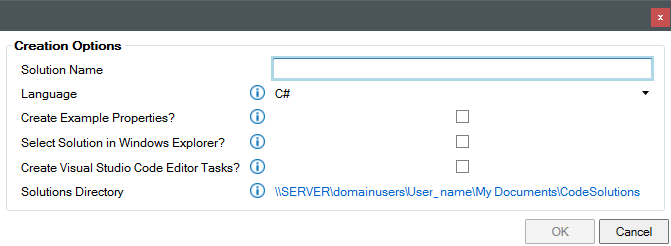
The available options are:
Solution Name (required) - the name of the Code Solution. This will be the name of the directory within the Solutions Directory that contains the Code Solution and the name of the solution file (with
.slnextension).Language (required) - the programming language of the project that will be created in the Code Solution. The options are C# and VB.NET.
Create Example Properties? (optional) - selecting this option will create a few example properties within the new Code Solution.
Select Solution in Windows Explorer? (optional) - selecting this option will open Windows Explorer and select the newly created solution file.
Create Visual Studio Code Editor Tasks? (optional) - selecting this option will create an additional directory within the solution directory that defines some tasks for the Visual Studio Code editor.
Refer to: Visual Studio Code for more information.
Add Code Solution Property
Click the Add Code Solution Property button.

The Code Solution Properties window is displayed.
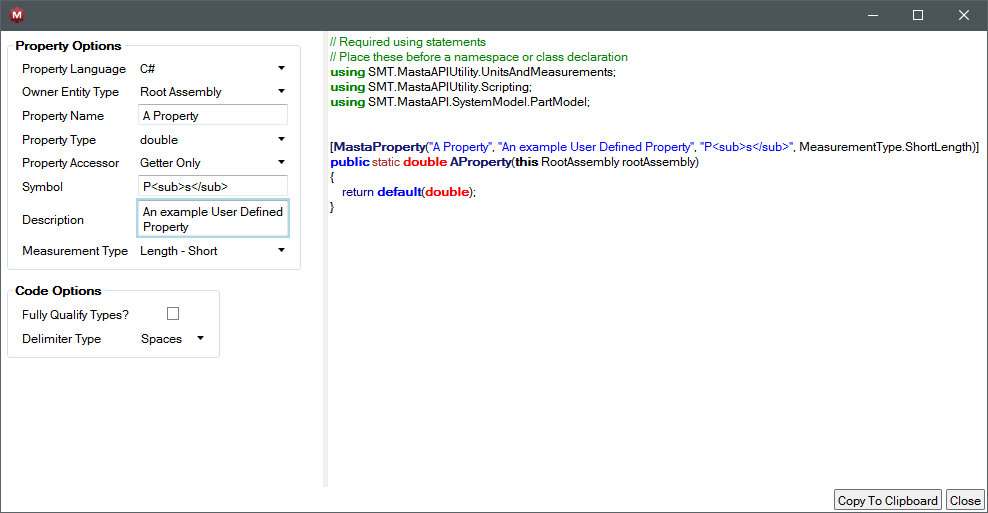
The window is split into 2 Sections:
Property Options
Property Language - The programming language to use for the preview code, for example:
C#
VB.NET
Owner Entity Type - Select one from a list of one or more entities related to the selected item in the Entity Tree.
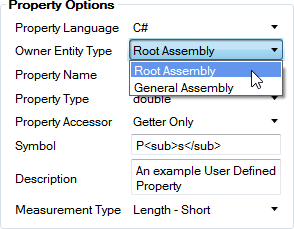
The User Defined Property will be attached to the Owner Entity Type and behave just like any other property.
Property Name - The name of the property. This can contain spaces, but they will be removed for naming the code method.
Property Type - the type of quantity the property represents.
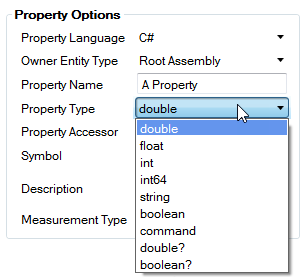
The Property Type options include:
double - a 64-bit floating point number
float - a 32-bit floating point number
int - a 32-bit whole number
int64 - a 64-bit whole number
string - a set of characters
boolean - true or false (yes or no)
command - can run arbitrary code
pythonCommand - can run arbitrary Python code
double? - nullable double, a double value or a null
boolean? - nullable boolean, a boolean value or null
Property Accessor - whether the property can be set (Setter Only), retrieved (Getter Only) or both set and retrieved (Getter and Setter)
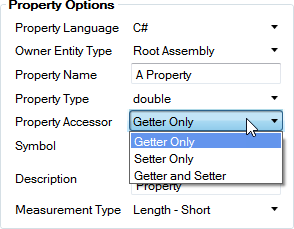
Symbol - a symbol that represents the property/quantity. This can include subscripts can enclosing text in
<sub></sub>tags or superscripts in<sup></sup>.Description - a description of the property. This can include subscripts can enclosing text in
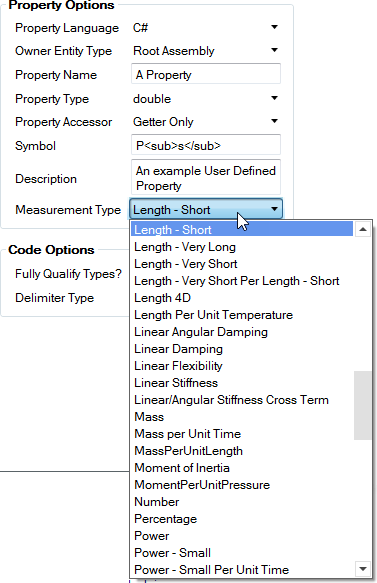
<sub></sub>tags or superscripts in<sup></sup>.Measurement Type - what type of quantity the property represents. Internally MASTA uses SI units for all quantities. The Measurement Type controls how that quantity appears in reports and interface controls within MASTA.
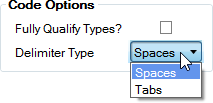
Fully Qualified Types? - whether to display types with their namespaces (or to have using statements.)
Delimiter Type - spaces or tabs for indentation.
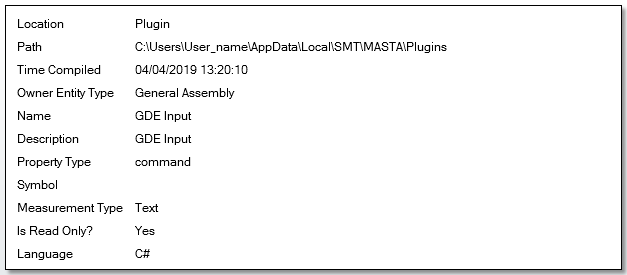
Click the Details... button located under the heading Show Property Details to display further information regarding that particular property.
Click the Calculate Button for a particular property to retrieve the value of that User Defined Property.
It is available for download here.
The Community Edition is free but comes with some licensing restrictions.
Alternatively, there is also Visual Studio Code, which is a free and open source editor that can be used to write User Defined Properties.
[CodeSolution].sln- the Visual Studio solution file. This links to the one or more project files and defines the platforms and configurations that the projects can be compiled to.MastaInstallation.props- is an XML file that contains a node that needs to refer to a MASTA installation directory..vscodedirectory - contains definitions of tasks that can be executed within Visual Studio Code to compile the Code Solution. Note; this directory may not be present if the user did not select the option for it to be created.[CodeSolution]directory - contains a project that is referenced by the solution and code files.[CodeSolution].csproj- a project file that links to code files and additional items.AssemblyExtensions.cs- a C# class file. User Defined Properties can be added to this file. Additional class files can be added to the project.Refer to: Visual Studio for more information.
Properties directory - contains metadata about the project.
To view this example property, select the Root Assembly of any design (even a new blank one) and locate the property within the Watch Window:

Click on the Details... button to display information about the property.
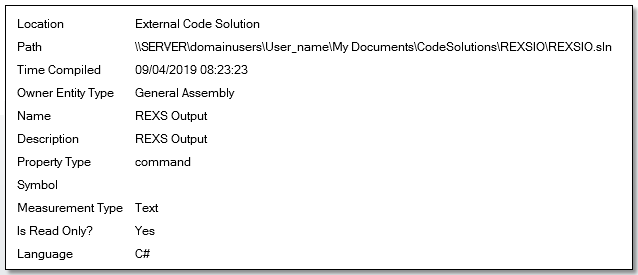
Click on the Calculate button within the Watch Window to retrieve the value of the property.

Code Options
After the required options have been selected, the generated property code in the code preview area can be copied to the clipboard by clicking the Copy to Clipboard button. It can then be pasted into a class file within a Code Solution.
Refresh
The Refresh button located in the Scripting Setup window can be used to Recompile Scripted Properties in MASTA, refreshing all the available User Defined Properties from either Plugins or Code Solutions.

Status Window
The Status window contains a list of Errors, Warnings and Messages regarding any compiled User Defined Properties.
Errors, Warnings, and Messages
Errors or Warnings that appear in the Status window will display information regarding any issues.

Properties
The Properties section contains an Entity Tree and a Watch Window.

Properties Entity Tree
The Properties Entity Tree displays a list of all available Entities. The Entity Tree will update to reflect any parts or assemblies selected from the Assembly View within MASTA.
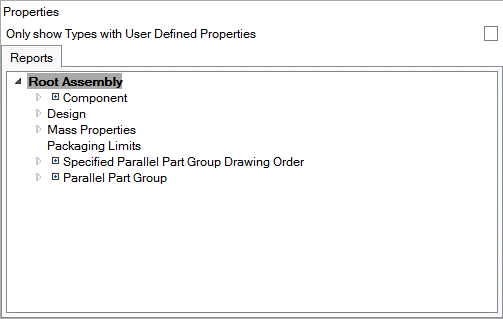
The items in the Entity Tree can be filtered to only show those that have User Defined Properties by checking the check box to the upper right of the Entity Tree control.
Selecting an item in the Entity Tree will update the list of User Defined Properties that are available in the Watch Window.
Watch Window
The Watch Window lists the available User Defined Properties for the item selected in the Entity Tree. The Watch Window displays the name, location, path, show property details popup and calculate option for each property. The Path column contains links, that when clicked, will open the location of the path item (either a Code Solution .sln file or a Plugin folder).

The calculate option can also be utilised to run a specific command. e.g. load a file from disk or create extra parts in the design.
User Defined Properties
User Defined Properties are additional properties that can be given to entities within a MASTA design (e.g. a Cylindrical Gear Set Design or a Root Assembly) that is defined through code. The code defining the User Defined Properties can be imported into MASTA in a pre-compiled format (Plugins) or in a non-compiled format (Code Solutions). The difference between the two approaches will be explained in the following sections.
Code Solutions
Code Solutions are a set of code files that define User Defined Properties. More formally, they are a Visual Studio Solution. Visual Studio is a Microsoft Integrated Development Environment (IDE) that has both free and paid-for editions.
Creating a Code Solution
The easiest method of creating a Code Solution within MASTA is to follow the instructions in the Code Solutions Options.
Refer to: Code Solution Options.
Creating a Code Solution automatically generates the file structure.
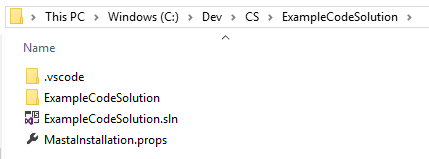
Opening the Code Solution folder gives access to the project file.

The function of the files and directories within the Code Solution directory are:
This path must include a trailing back slash e.g. C:\Program Files\SMT\MASTA 10.0</code>. This is required to be able to compile the Code Solution from within Visual Studio or Visual Studio Code.
Within the project directory the function of the files is:
Opening a Code Solution for Editing
The solution can be loaded in Visual Studio by double clicking on the .sln file or by opening Visual Studio and loading the solution from within.
If Visual Studio Code is used to write User Defined Properties, right- clicking on the directory that contains the .sln file, will give a context menu option.

Creating a User Defined Property
A User Defined Property is a property that can be attached to an Entity within a MASTA design (e.g. a Cylindrical Gear Set Design or a Root Assembly). The property can be used to retrieve a value, set a value or get and set a value. Technically, a User Defined Property would be created that can be consumed by MASTA by making use of extension methods.
Refer to: Extension Methods (C# Programming Guide).

The above example was created using MASTA by clicking the Add Code Solution Property located in the Scripting Tab and entering the values as follows:
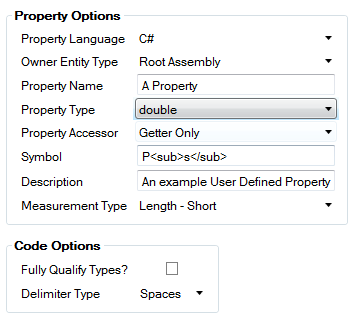
The generated code can be copied and pasted into the file AssemblyExtensions.cs (located inside the class declaration). Saving the modified class file and clicking the Refresh button located within the Scripting Tab, MASTA will compile the new code and make the new User Defined Property available for use.
To set the value of a User Defined Property, an additional extension method needs to be written (select the Property Accessor option Getter and Setter within the Add Code Solution Property window).
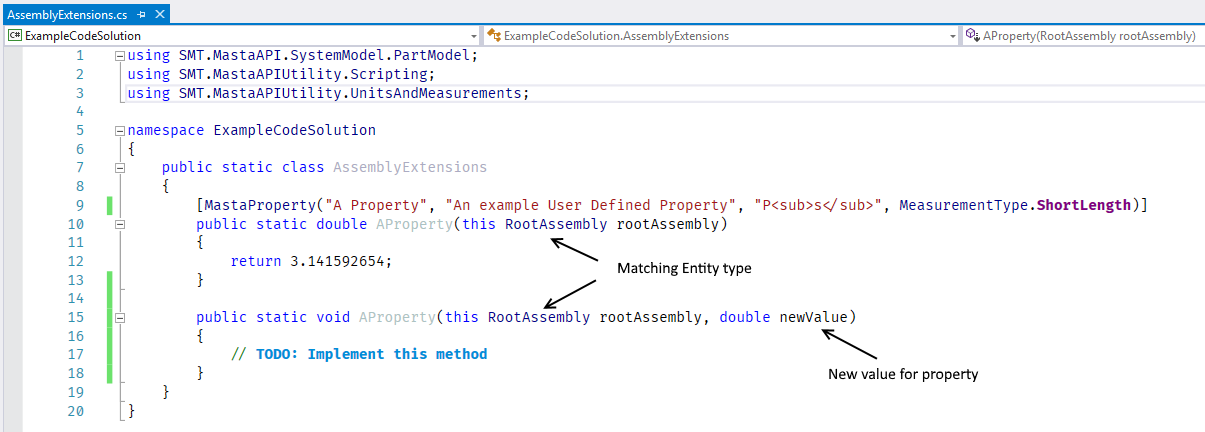
To be a valid User Defined Property that allows getting and setting a value, the method names must match (in this example it is AProperty) and parameters must be consistent (both examples take a RootAssembly and either return or take a double value).
Existing entities and entity properties of items can be accessed within a MASTA design using the MastaAPI library. API is a programming term that translates to Application Programming Interface. It provides a way of interacting with objects within a MASTA design and even deleting or adding additional ones. For example: If the AProperty getter method is modified using Visual Studio:
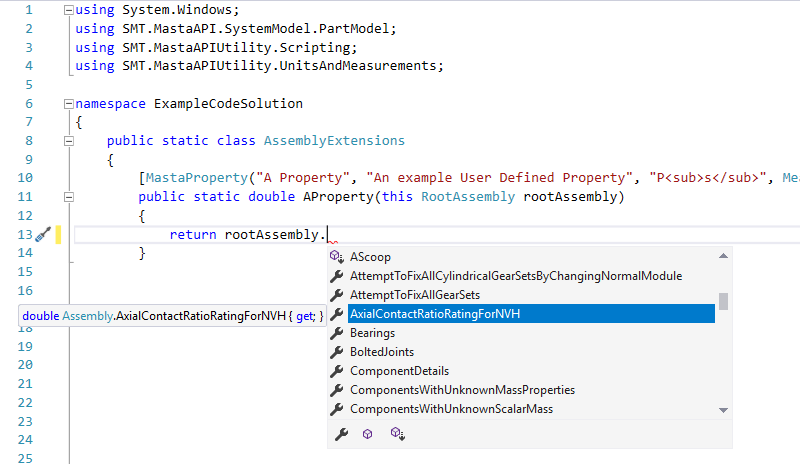
A list of properties available on a Root Assembly object can be viewed when pressing the dot (full stop) key. (this is called autocomplete or IntelliSense). Using the up and down arrow keys will select a property in the list, hitting the return key will write the selected property name into the editor. The entity properties are provided by the MastaAPI library that is referenced by the Code Solution project.
If there are any errors and warnings about not locating the MastaAPI project, it may be an indication that the MastaInstallation.props file has not been set up correctly to point to a suitable MASTA installation (verify the MastaInstallation.props file and close and reopen Visual Studio).
Plugins
Plugins are simply compiled Code Solutions. When a Code Solution is compiled at least one dll is generated (more may be generated if the Code Solution contains more than one project). The compiled Code Solution may be distributed to other MASTA users. Placing the compiled .dll files into the Plugin folder will allow MASTA to scan them and import any User Defined Properties.
In the previous section a Code Solution was created called ExampleCodeSolution. Compiling this Code Solution (using the Debug|x64 configuration) will create the files to use as a Plugin.

To allow MASTA to import the User Defined Properties defined within the file ExampleCodeSolution.dll it should be copied to the Plugins folder (to find or set this location click the Edit Scripting Settings button.)
Plugins provide a method of distributing User Defined Properties that cannot be modified by other users.
Plugins and their dependency libraries can be segregated by placing them in sub-folders within the main plugin directory. For example, if the Plugins directory had the following structure:
C:/DEV/PLUG
|   CustomProperties.dll
|   ExampleCodeSolution.dll
|   OtherProperties.dll
│
└───AnotherPlugin
|       AnotherCustomProperties.dll
|       AnotherExampleCodeSolution.dll
|       AnotherOtherProperties.dll
|
└───MorePlugins
        MoreCustomProperties.dll
        MoreExampleCodeSolution.dll
        MoreOtherProperties.dll
The *.dll files are logically grouped into three sets. This provides better control and a cleaner structure allowing easier identification of clashes in library names or versions.
Using User Defined Properties
User Defined Properties can be used throughout MASTA, just like any normal property that is defined on an Entity within a Design.
Custom Reports
User Defined Properties can be included in Custom Reports just like any other property. When editing a Custom Table, any User Defined Properties are listed separately to the usual properties.
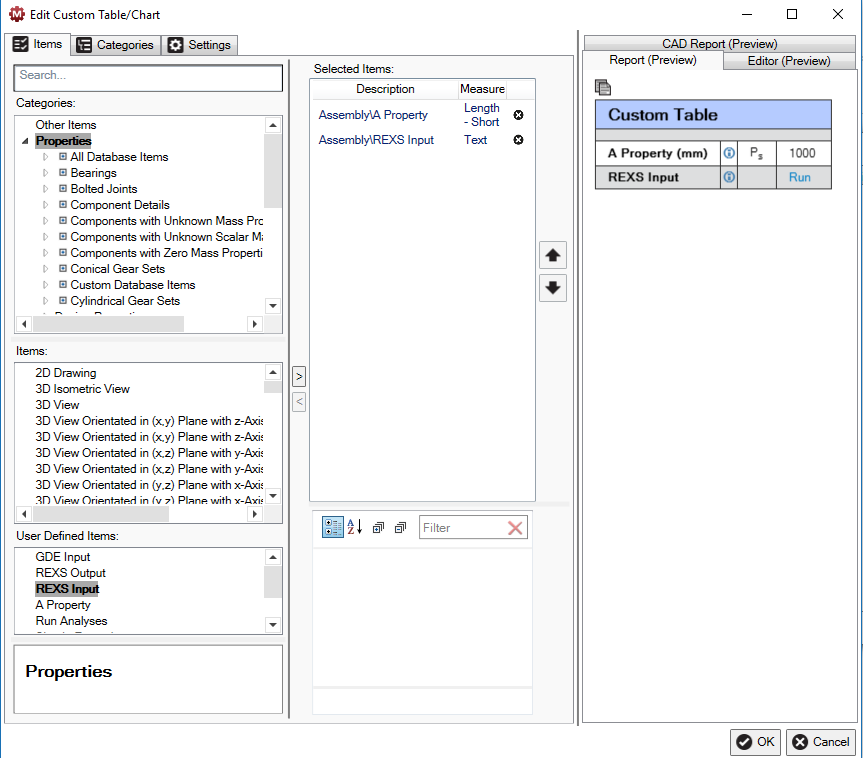
Property Editors
User Defined Properties appear like any other property when viewed in a Property Editor:
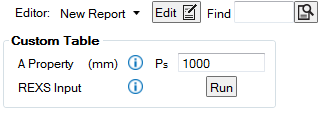
If a User Defined Property allows setting the value, a textbox will allow a value to be entered. It is important to understand that when the entered value “reaches” the users code it will have been converted to SI units. So, for example, if a property represents a length and is being currently displayed to the user in millimetres, any entered value will be converted to metres before being passed into user code. Concretely, if a user enters 1000mm into a property textbox, it will be converted to the value 1 and passed to the user’s code.
User Defined Properties that define a command will present as a button in a property editor.
Parametric Study Tool
If licensed to use the Parametric Study Tool the User Defined Properties can be used as Parametric Study variables, logging and results.
Design Space Search
If licensed to use Design Space Search, User Defined Properties can be used when creating a search strategy.
Runna
If licensed to use Runna then User Defined Properties are available to be used as inputs (if a setter is defined) and outputs (if a getter is defined).
Edit Scripting Settings
Change default save locations
Click the
Edit Scripting Settings > Edit button.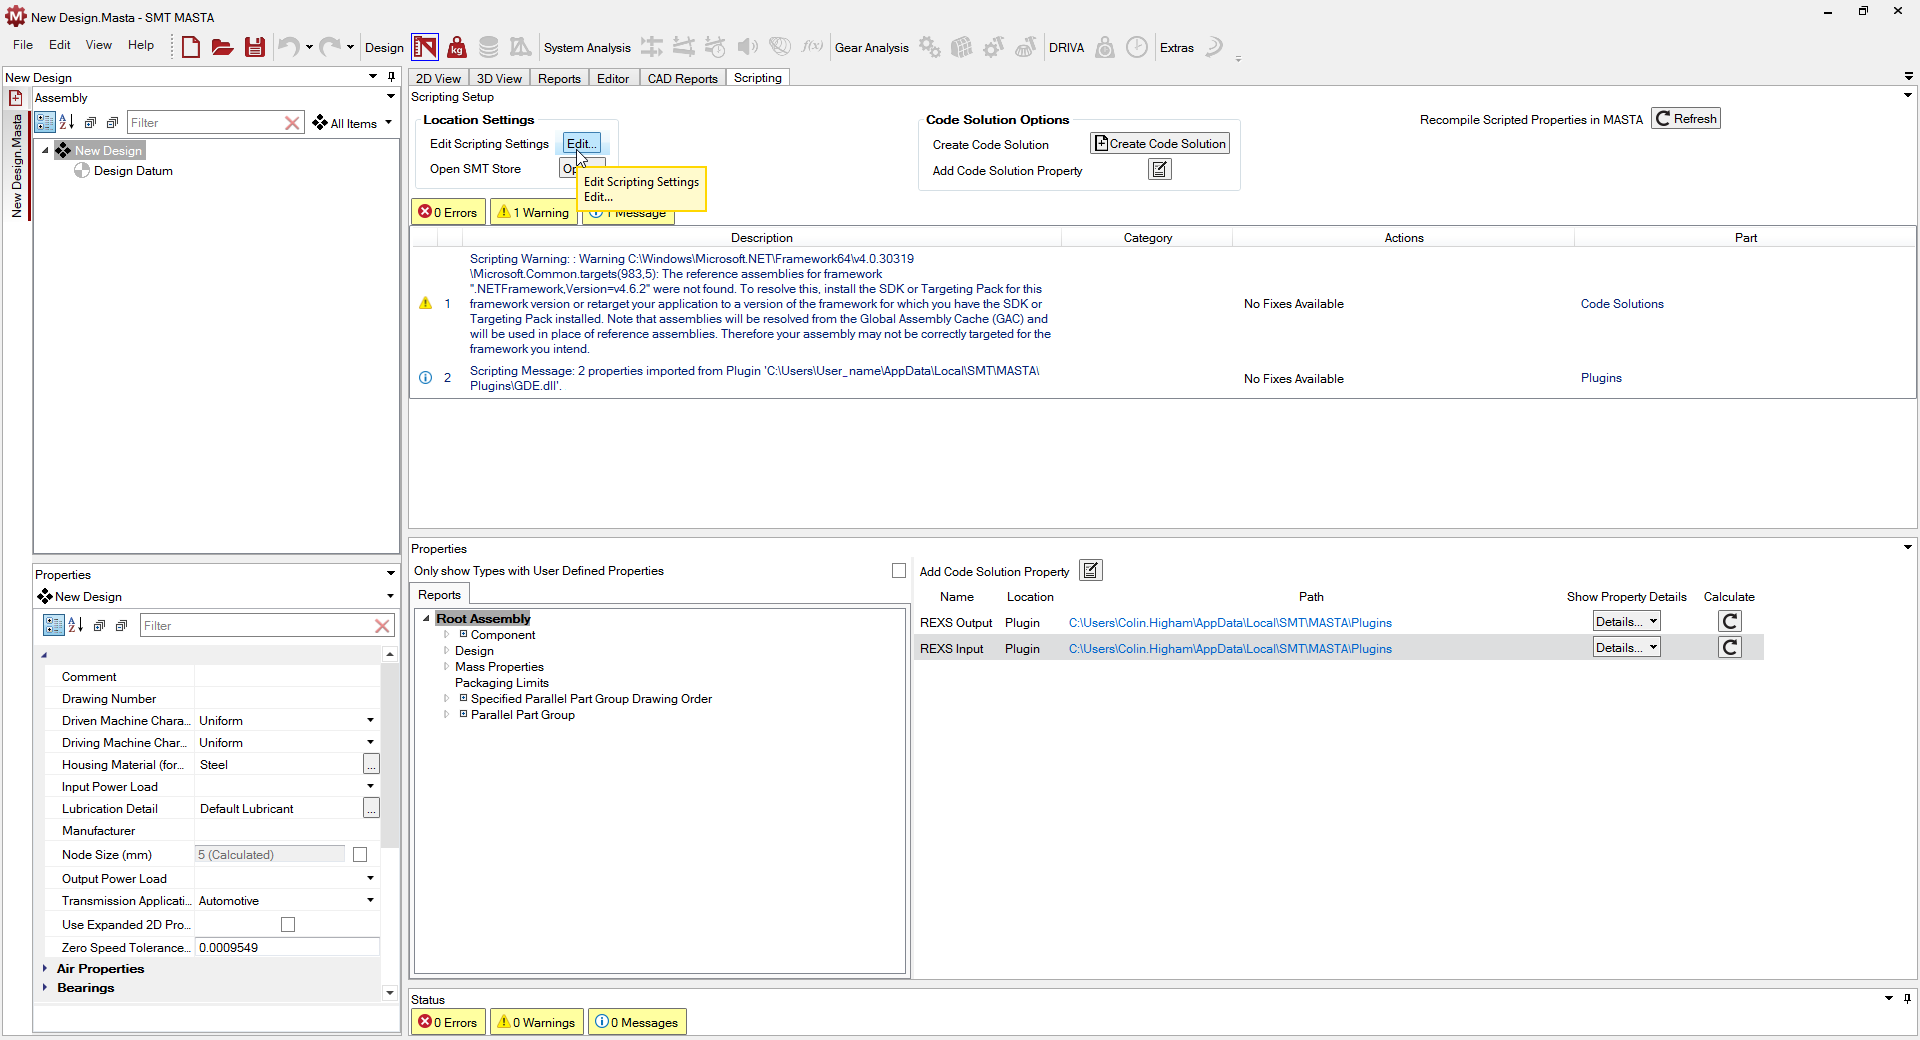
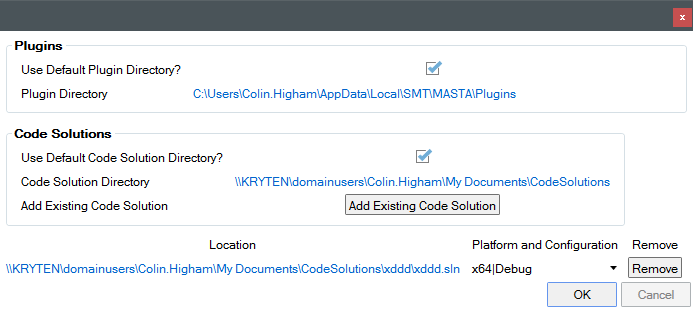
To change the default save location uncheck the Use Default Plugin Directory? option.
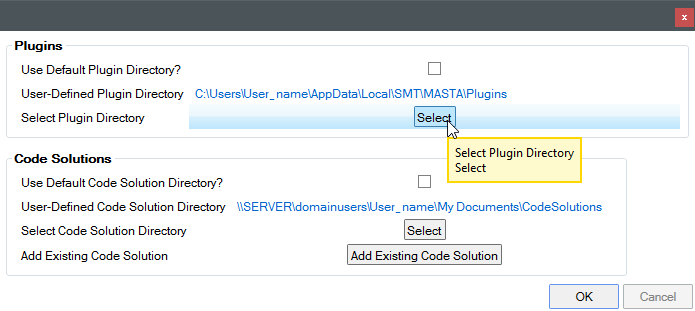
The Select Plugin Directory option becomes available.
Click on the Select button, browse to the desired location and click OK.
To revert back to the default location, simply re-select the Use Default Plugin Directory? option.
Solution Code Removal
To remove the installed Solution Code click on the Remove button.
